针对JAVA期末课设的学习记录
准备
前端
Vue2
[vue的学习记录(更新中)](开启VUE的学习记录 | 刘宇的个人博客)
element-ui
bootstrap5
axios
后端
数据库
开发工具
实现后端增删改查
首先我们新建一个文件夹,通过cmd输入命令 vue create front(为前端项目命名为”front”),选择vue2。在创建vue的同时,我们可以在这段时间创建数据库,登陆msql之后,source + 数据库的路径可以将之前设计好的数据库拖过来。
之后我们打开Idea,选择new project - > 点击next- > 选择Maven - > 选择新建的文件夹路径\back(为前端项目命名为”back”)
在maven的pom.xml文件中引入依赖后刷新maven
<?xml version="1.0" encoding="UTF-8"?>
<project xmlns="http://maven.apache.org/POM/4.0.0"
         xmlns:xsi="http://www.w3.org/2001/XMLSchema-instance"
         xsi:schemaLocation="http://maven.apache.org/POM/4.0.0 http://maven.apache.org/xsd/maven-4.0.0.xsd">
    <modelVersion>4.0.0</modelVersion>

    <groupId>org.example</groupId>
    <artifactId>mybatis_plus01</artifactId>
    <version>1.0-SNAPSHOT</version>

    <properties>
        <maven.compiler.source>8</maven.compiler.source>
        <maven.compiler.target>8</maven.compiler.target>
    </properties>
    <parent>
        <groupId>org.springframework.boot</groupId>
        <artifactId>spring-boot-starter-parent</artifactId>
        <version>2.6.7</version>
        <relativePath/>
    </parent>
    <dependencies>
        <dependency>
            <groupId>org.springframework.boot</groupId>
            <artifactId>spring-boot-starter</artifactId>
        </dependency>
        <dependency>
            <groupId>org.springframework.boot</groupId>
            <artifactId>spring-boot-starter-test</artifactId>
            <scope>test</scope>
        </dependency>
        <dependency>
            <groupId>org.springframework.boot</groupId>
            <artifactId>spring-boot-starter-web</artifactId>
        </dependency>
        <dependency>
            <groupId>com.baomidou</groupId>
            <artifactId>mybatis-plus-boot-starter</artifactId>
            <version>3.5.1</version>
        </dependency>
        <dependency>
            <groupId>org.projectlombok</groupId>
            <artifactId>lombok</artifactId>
            <optional>true</optional>
        </dependency>
        <dependency>
            <groupId>mysql</groupId>
            <artifactId>mysql-connector-java</artifactId>
            <scope>runtime</scope>
        </dependency>
        <dependency>
            <groupId>com.google.code.gson</groupId>
            <artifactId>gson</artifactId>
            <version>2.8.5</version>
        </dependency>
    </dependencies>
</project>
在source下创建一个文件(file),重命名为”application.yaml”
spring:
  datasource:
    username: root
    password: '123456'
    url: jdbc:mysql://127.0.0.1:3306/demo3?characterEncoding=UTF-8&serverTimezone=UTC
    driver-class-name: com.mysql.cj.jdbc.Driver
写法很固定,username和password分别是用户名和密码(注意打上单引号),url中加上数据库。
接下来在java下新建一个包”org.example.Application”,最后就会创建出一个Application类作为启动类
package org.example;

import org.mybatis.spring.annotation.MapperScan;
import org.springframework.boot.SpringApplication;
import org.springframework.boot.autoconfigure.SpringBootApplication;

@SpringBootApplication
@MapperScan("org.example.mapper")
public class Application {

    public static void main(String[] args) {
        SpringApplication.run(Application.class, args);
    }
}
新建一个Student类,通过Navicat的设计表查看(也可以在cmd中输入命令”desc+表名”查看)有哪些属性,类型需要一一匹配。通过lombok可以帮助我们快速生成构造方法、toString方法等等。
package org.example.pojo;

import lombok.Data;

@Data
public class Student {
    private Long id;
    private String date;
    private String content;
    private Integer num1;
    private Integer num2;
    private Integer num3;
    private Integer num4;
}
在mapper包下创建一个StudentMapper接口
package org.example.mapper;

import com.baomidou.mybatisplus.core.mapper.BaseMapper;
import org.example.pojo.Student;

public interface StudentMapper extends BaseMapper<Student> {
}
创建Controller类配置路由规则,Gson可以将查出来的数据转成字符串,这个时候会有警告,在上方加上@SuppressWarnings(“all”)
package org.example;

import com.google.gson.Gson;
import org.example.mapper.StudentMapper;
import org.example.pojo.Student;
import org.springframework.beans.factory.annotation.Autowired;
import org.springframework.web.bind.annotation.*;

import java.util.List;

@RestController
@SuppressWarnings("all")
@CrossOrigin(origins = {"*", "null"})
public class Controller {
    @Autowired
    private StudentMapper studentMapper;
    private Gson gson=new Gson();

    @GetMapping("/students")
    public String getStudents(){
        List<Student> students = studentMapper.selectList(null);
        return gson.toJson(students);
    }
    @PostMapping("/add")
    public  void addStudent(@RequestBody Student student){
        studentMapper.insert(student);
    }
    @PostMapping("delete")
    public void removeStudent(@RequestBody Student student){
        studentMapper.deleteById(student);
    }
    @PostMapping("update")
    public void updateStudent(@RequestBody Student student){
        studentMapper.updateById(student);
    }
}
(以下都是零碎的知识点记录,我会在考完后的6月25日晚整理好后更新的,图片未上传图床所以没有加载出来,)
输入命令cd . 用vscode打开
会报错,需要在项目中打开
npm run serve
在浏览器中输入 localhost:8080
自带的组建中,我们进行一下修改
将它自带的都删掉,
vue
1. 在A组建中使用B组建
import B from "./B.vue"2.可以用< />代替成对标签
3. 通过data(){return }的方式传输数据
常用指令
vue create + 名称
npm i hexo-cli -g
一些代码
v-for
v-show
需要注意的几点
需要多单词驼峰命名
@click需要加@
methods不要忘记加s
return中的用逗号隔开
冒号前需要有空格
一些小插曲
npm i hexo-cli -g
由npm安装
箭头函数 如果使用了this,不会指向当前对象本身,而是指向外面的
axios本身就是函数
alert() 警告消息框 该消息框提供了一个“确定”按钮让用户关闭该消息框
confirm() 确认消息框 使用确认消息框可向用户问一个“是-或-否”问题,并且用户可以选择单击“确定”按钮或者单击“取消”按钮
prompt() 提示消息框 提示消息框提供了一个文本字段,用户可以在此字段输入一个答案来响应您的提示
通过lombok生成方法,tostring等等
add是大括号{}
npm i axios
npm i bootstrap@5.2.0-beta1
https://getbootstrap.com/docs/5.2/content/tables/
npm i element-ui
11月17日开始更新
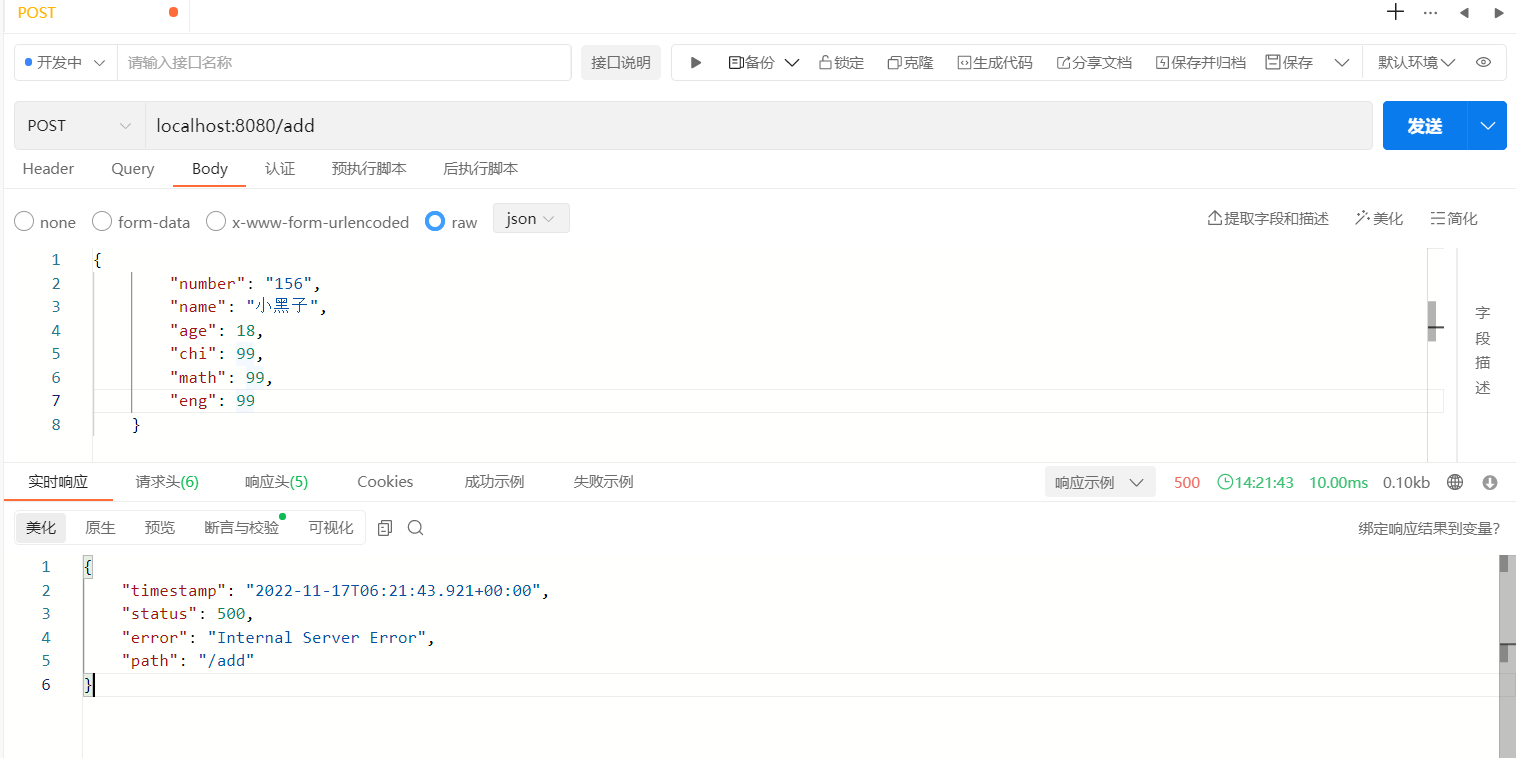
关于500的报错
在使用apipost的过程中,在调试增功能时出现了500的报错
当时找了很久的错误,后来在IDEA的提示中找到了答案,
提示说place的值为空,于是回到数据库查看设计表
果然是这一块的设置为not null,报错的问题找到了。


